
Managed to unscrew the bolt this evening.
The threads on both the bolt and the case are "tired". But i found a bolt in my grab bag of Imperial bolts that actually screws in and will go "tight".
Old bolt on left....
So I'm going to cut it a bit shorter (both bolts are twice as long as they need to be), and smother the top end of the threads with silicon and put it in with an ally crush washer (unless i can find a suitable fibre, but i detest fibre washers).
Before that though, I'm going to stuff an endoscope into the hole!
New Project(s)
-
Rockburner

- Posts: 6008
- Joined: Sun Mar 15, 2020 11:06 am
- Location: Hiding in your blind spot
- Has thanked: 10930 times
- Been thanked: 3975 times
-
Rockburner
- Posts: 6008
- Joined: Sun Mar 15, 2020 11:06 am
- Location: Hiding in your blind spot
- Has thanked: 10930 times
- Been thanked: 3975 times
Re: New Project(s)
Pondering the carb overnight.... I'm wondering if the paper gasket that sits between the jet block and the main body is doing it's job. When I reassembled the carb I nearly made a viton seal for that location, simply because it wouldn't glue itself to the ally like paper gaskets tend to, but now I wonder if it would be worth doing for a better seal. I also realised that I put the gasket in "naked"..... which might have been an error.
Part 32 below:
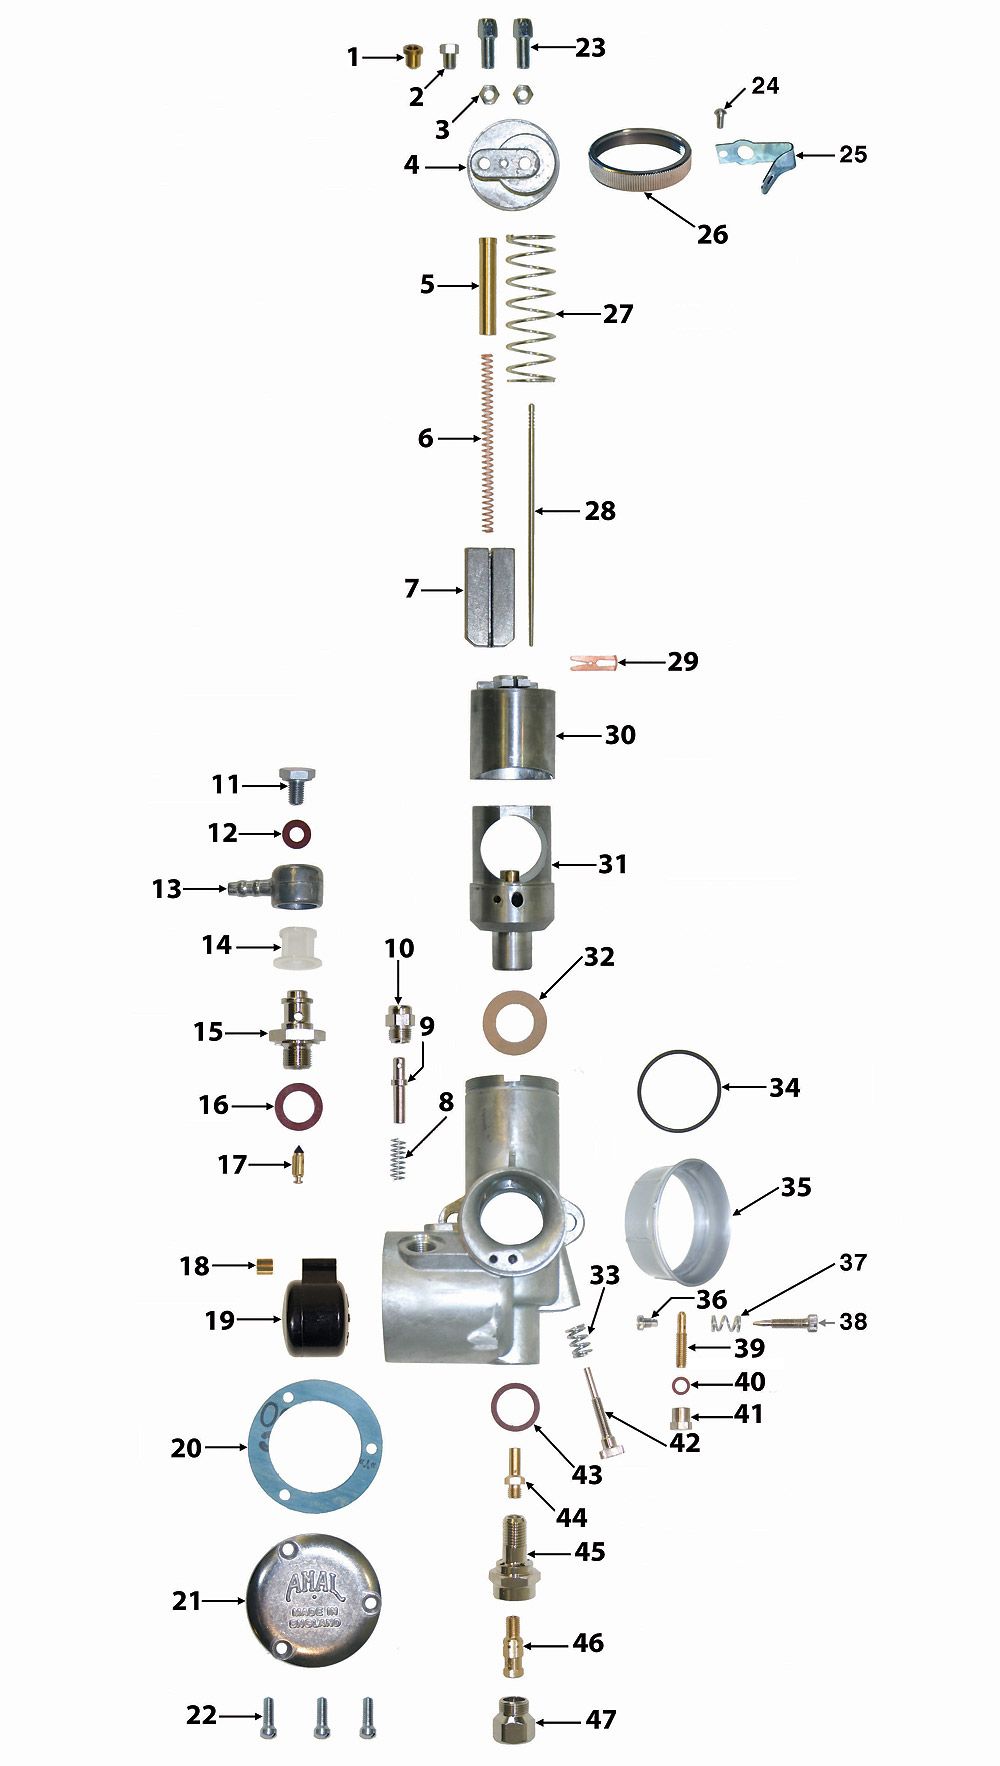
Part 32 below:
non quod, sed quomodo
-
Taipan

- Posts: 19281
- Joined: Sat Mar 14, 2020 1:48 pm
- Location: Essex Riviera!
- Has thanked: 20803 times
- Been thanked: 13610 times
Re: New Project(s)
As I say, i'm not familiar with these carbs, but if its coming out of the bellmouth then it must be coming up the main jet? Is the needle seating correctly?
NC750X mpg 
-
Rockburner
- Posts: 6008
- Joined: Sun Mar 15, 2020 11:06 am
- Location: Hiding in your blind spot
- Has thanked: 10930 times
- Been thanked: 3975 times
Re: New Project(s)
Rockburner wrote: Tue Aug 08, 2023 8:19 pm Managed to unscrew the bolt this evening.
The threads on both the bolt and the case are "tired". But i found a bolt in my grab bag of Imperial bolts that actually screws in and will go "tight".
Old bolt on left....
So I'm going to cut it a bit shorter (both bolts are twice as long as they need to be), and smother the top end of the threads with silicon and put it in with an ally crush washer (unless i can find a suitable fibre, but i detest fibre washers).
Before that though, I'm going to stuff an endoscope into the hole!
oh yeah - just an addendum to this... that old bolt, once I got it out, I discovered that it can be pushed in and out of the hole without rotating it!
The threads on the bolt are rounded off, and the threads on the casing are presumably as rounded that they don't properly engage any more!.
When I put the new bolt in I'm going to have to be very gently with it. Long term the fix will be to strip the head and barrel off, and the timing gear, and re-tap the hole, but for this year I"m just going to try to seal the hole as best I can to get the bike on the road without pissing oil everywhere and see if it will actually go more than a mile!
non quod, sed quomodo
-
Demannu
- Posts: 1882
- Joined: Sat May 08, 2021 5:14 pm
- Location: Another day without using algebra
- Has thanked: 65 times
- Been thanked: 1234 times
Re: New Project(s)
And tightening puch screws!Rockburner wrote: Fri Jul 28, 2023 7:20 pm 16905683395036758114899450305565.jpg
I give up. I am officially crap at fitting inner tubes.
-
Rockburner
- Posts: 6008
- Joined: Sun Mar 15, 2020 11:06 am
- Location: Hiding in your blind spot
- Has thanked: 10930 times
- Been thanked: 3975 times
Re: New Project(s)
Which needle? the float needle or the jet needle?Taipan wrote: Wed Aug 09, 2023 10:19 am As I say, i'm not familiar with these carbs, but if its coming out of the bellmouth then it must be coming up the main jet? Is the needle seating correctly?

As far as I can make out they're both ok. If the float needle wasn't seating correctly then the fuel would continue to pour in from the tank, and overflow everywhere, which doesn't happen.
The jet needle is certainly sitting down the jet tube, but I don't think it would actually prevent fuel flow when it's at the bottom of it's movement (not sure about that tbh), it's on the middle of it's 5 positions.
non quod, sed quomodo
-
Taipan
- Posts: 19281
- Joined: Sat Mar 14, 2020 1:48 pm
- Location: Essex Riviera!
- Has thanked: 20803 times
- Been thanked: 13610 times
Re: New Project(s)
I don't know about any float bowl vents within the carb body, but if the fuel isn't coming up and out of the tickler as it should, and is getting into the venturi instead, then there is a limited number of escapes for it with the MJ being the obvious one.
NC750X mpg
-
Rockburner
- Posts: 6008
- Joined: Sun Mar 15, 2020 11:06 am
- Location: Hiding in your blind spot
- Has thanked: 10930 times
- Been thanked: 3975 times
Re: New Project(s)
More shenanigans....
Took the wheels for the Puch for new (heavy duty) inner tubes and fitting last week.


The original Cheng Shin tyres are tired, but still usable with plenty of tread.
The tyre guy (Rubber Ranch) even managed to get one of them on without tools.... just a LOT of lubrication!
This week I blagged myself a new (2nd hand) twistgrip for the Puch, and went to fit it. I stripped down both the new and the old twistgrips, mainly to try and figure out why the old one was so stiff. It had a fair bit of surface rust, but nothing untoward in it. What it DID have though was a small steel "spring" acting against the barrel . I also stripped off the old grip (still usable) for use on the new unit.
Initially I put the new unit (without the grip), but as I was gently screwing up one of the two screws that hold it in place (I've also drilled an indent in the bar to hold the assembly in place without too much pressure), the sodding plastic cracked completely across the top! GAH!

SODDIT.
Then it occurred to me that it might be repairable..... so I dug out my soldering iron and had a go: first at the original (which had cracks, but none were completely across the part), then the new part. The original is so sun-faded it's virtually white... it should be black!


I wasn't going for "pretty", but they both ended up "functional", which right now is good enough!
Given that they both seemed solid, I decided to use the "new" casing, with the old barrel (it's a bit longer, oddly), with the "new" cover piece (the steel bit over the cable fitting), and reassembled it and fitted it. Note I left out the the "damper spring" because I couldn't see why on earth it would even be in there!


Looks much better! and the throttle movement is now free and easy, and returns easily - much better!
I aslo "derestricted" the bike: by the simple expedient of removing the air-filter with the metal plate across it from the airbox. (will take a photo of this next time).
Bike now runs better, and is easy to control
Took the wheels for the Puch for new (heavy duty) inner tubes and fitting last week.
The original Cheng Shin tyres are tired, but still usable with plenty of tread.
The tyre guy (Rubber Ranch) even managed to get one of them on without tools.... just a LOT of lubrication!
This week I blagged myself a new (2nd hand) twistgrip for the Puch, and went to fit it. I stripped down both the new and the old twistgrips, mainly to try and figure out why the old one was so stiff. It had a fair bit of surface rust, but nothing untoward in it. What it DID have though was a small steel "spring" acting against the barrel
. I also stripped off the old grip (still usable) for use on the new unit.Initially I put the new unit (without the grip), but as I was gently screwing up one of the two screws that hold it in place (I've also drilled an indent in the bar to hold the assembly in place without too much pressure), the sodding plastic cracked completely across the top! GAH!
SODDIT.
Then it occurred to me that it might be repairable..... so I dug out my soldering iron and had a go: first at the original (which had cracks, but none were completely across the part), then the new part. The original is so sun-faded it's virtually white... it should be black!
I wasn't going for "pretty", but they both ended up "functional", which right now is good enough!
Given that they both seemed solid, I decided to use the "new" casing, with the old barrel (it's a bit longer, oddly), with the "new" cover piece (the steel bit over the cable fitting), and reassembled it and fitted it. Note I left out the the "damper spring" because I couldn't see why on earth it would even be in there!
Looks much better! and the throttle movement is now free and easy, and returns easily - much better!
I aslo "derestricted" the bike: by the simple expedient of removing the air-filter with the metal plate across it from the airbox.
(will take a photo of this next time).Bike now runs better, and is easy to control
non quod, sed quomodo
-
Rockburner
- Posts: 6008
- Joined: Sun Mar 15, 2020 11:06 am
- Location: Hiding in your blind spot
- Has thanked: 10930 times
- Been thanked: 3975 times
Re: New Project(s)
So - having improved the Puch, I returned to the JAPton.
I had an idea that the issue with the carb tickler might have been the paper gasket between the jet block and the main body (the surfaces this gasket mates to are not the smoothest....). So I stripped the carb down and put a small amount of blue-hylomar on each face of the gasket and reassembled it.
No difference. Whatever is preventing the tickler working correctly is still evading me. Next attempt will mean going into the float bowl itself and seeing there's something odd about the interface between the tickler and the float. I've been doing some reading up and it seems that the new nylon floats sometimes cause minor problems so it's worth taking a look.
I had an idea that the issue with the carb tickler might have been the paper gasket between the jet block and the main body (the surfaces this gasket mates to are not the smoothest....). So I stripped the carb down and put a small amount of blue-hylomar on each face of the gasket and reassembled it.
No difference. Whatever is preventing the tickler working correctly is still evading me. Next attempt will mean going into the float bowl itself and seeing there's something odd about the interface between the tickler and the float. I've been doing some reading up and it seems that the new nylon floats sometimes cause minor problems so it's worth taking a look.
non quod, sed quomodo
-
Count Steer

- Posts: 15868
- Joined: Mon Jul 19, 2021 4:59 pm
- Has thanked: 8005 times
- Been thanked: 5663 times
Re: New Project(s)
Nice to know that Rubber Ranch is still going.  (I'm still using one of his keyrings from about 12010!). He used to come and change the bike tyres in the office car park but moved to Kent so I switched to the Guildford Tyre bike place in Chilworth...interesting getting the LT (or GT, can't remember) in and out of their workshop.
(I'm still using one of his keyrings from about 12010!). He used to come and change the bike tyres in the office car park but moved to Kent so I switched to the Guildford Tyre bike place in Chilworth...interesting getting the LT (or GT, can't remember) in and out of their workshop.The plural of 'anecdote' is not 'data'.
-
Rockburner
- Posts: 6008
- Joined: Sun Mar 15, 2020 11:06 am
- Location: Hiding in your blind spot
- Has thanked: 10930 times
- Been thanked: 3975 times
Re: New Project(s)
Oh yeah - Also - last week I "fixed" the hole in the JAPtons crank cases (timing chest actually).
I did stick an endoscope down it, but there wasn't a lot to see!
I cut down the new bolt so that it was roughly the length required to fill the cases, with a crush washer on top:

Then fitted it in with a good amount of Soudall Fix-All smeared into the threads and around the crushwasher and head. With any luck that will act as a seal and thread-lock even though the bolt isn't done up that tight. I tried very hard NOT to strip the threads so only did it up as tight as I dared....

Obviously will be keeping an eye on it, but I can't move it with my fingers... so it's an improvement !
I did stick an endoscope down it, but there wasn't a lot to see!
I cut down the new bolt so that it was roughly the length required to fill the cases, with a crush washer on top:
Then fitted it in with a good amount of Soudall Fix-All smeared into the threads and around the crushwasher and head. With any luck that will act as a seal and thread-lock even though the bolt isn't done up that tight. I tried very hard NOT to strip the threads so only did it up as tight as I dared....
Obviously will be keeping an eye on it, but I can't move it with my fingers... so it's an improvement !
non quod, sed quomodo
-
Rockburner
- Posts: 6008
- Joined: Sun Mar 15, 2020 11:06 am
- Location: Hiding in your blind spot
- Has thanked: 10930 times
- Been thanked: 3975 times
Re: New Project(s)
He's based out of Bagshot now, very convenient for me: my office is in Bracknell,Count Steer wrote: Fri Aug 18, 2023 10:45 am Nice to know that Rubber Ranch is still going.
non quod, sed quomodo
-
Skub

- Posts: 14892
- Joined: Mon Mar 16, 2020 5:32 pm
- Location: Norn Iron
- Has thanked: 13109 times
- Been thanked: 14170 times
Re: New Project(s)
Screwd could probably print you a twistgrip for the Pooch.
"Be kind to past versions of yourself that didn't know what you know now."
Walt Whitman
https://soundcloud.com/skub1955
Walt Whitman
https://soundcloud.com/skub1955
-
Rockburner
- Posts: 6008
- Joined: Sun Mar 15, 2020 11:06 am
- Location: Hiding in your blind spot
- Has thanked: 10930 times
- Been thanked: 3975 times
Re: New Project(s)
Now I have a spare to take measurements from, it's a possibility.
non quod, sed quomodo
-
Rockburner
- Posts: 6008
- Joined: Sun Mar 15, 2020 11:06 am
- Location: Hiding in your blind spot
- Has thanked: 10930 times
- Been thanked: 3975 times
Re: New Project(s)
All true, i probably wouldn't trust it on a road bike, bit for a little field bike it's holding up at present.Screwdriver wrote: Fri Aug 18, 2023 12:56 pm Indeed I could. Meanwhile, soldering rarely if ever works without reenforcing material (like copper strands etc). Ideally you would hot staple it first and only use a soldering iron at 250ºC or less depending on the plastic. Most soldering irons are way to hot, burn the plastic (even though it looks good) and the "repair" is cosmetic at best.
PS I often see people recommend using zip ties as filler but they can be nylon or abs (or anything really). The only good weld is when you use the same filler as the parent material.
non quod, sed quomodo
-
Rockburner
- Posts: 6008
- Joined: Sun Mar 15, 2020 11:06 am
- Location: Hiding in your blind spot
- Has thanked: 10930 times
- Been thanked: 3975 times
Re: New Project(s)
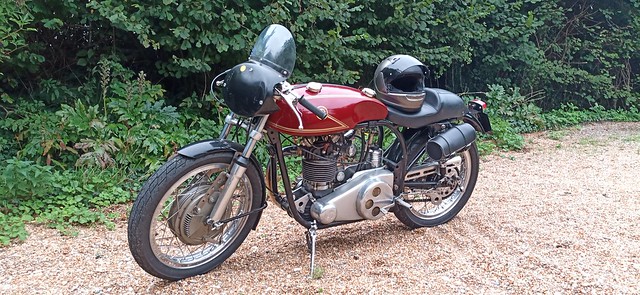
Took the JAPton out for a spin round the block this evening.
It might run ok at less than 1/4 throttle, but any more than that and it starts bogging down, won't fire at all, then after 2 or 3 deafening explosions from the exhaust it'll pick up and run well for about 10 seconds before it starts bogging down again.
Rinse and repeat again and again if I try to ride it anything more than 1/4 throttle (ish).
And obviously it's still pissing oil....
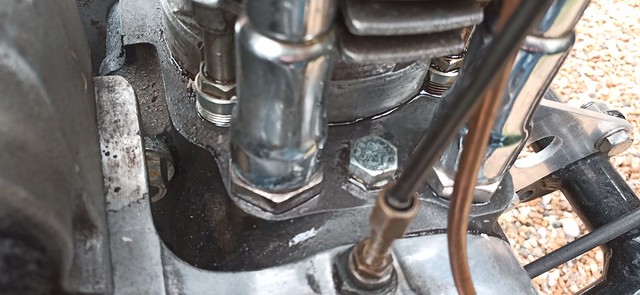

So... Back to to the tuning leaflets....
non quod, sed quomodo
-
KungFooBob

- Posts: 17481
- Joined: Sat Mar 14, 2020 1:04 pm
- Location: The content of this post is not AI generated.
- Has thanked: 627 times
- Been thanked: 9448 times
-
Rockburner
- Posts: 6008
- Joined: Sun Mar 15, 2020 11:06 am
- Location: Hiding in your blind spot
- Has thanked: 10930 times
- Been thanked: 3975 times
Re: New Project(s)
You'll tune it up properly and make it oil tight? Luvverly, when can you pick it up?

non quod, sed quomodo
-
cheb
- Posts: 5457
- Joined: Tue Mar 17, 2020 6:51 am
- Been thanked: 2721 times
-
Rockburner
- Posts: 6008
- Joined: Sun Mar 15, 2020 11:06 am
- Location: Hiding in your blind spot
- Has thanked: 10930 times
- Been thanked: 3975 times
Re: New Project(s)
Not sure, bit would need to go one size up from the current, and obviously strip the engine to nigh on its component parts before doing a tap job.
non quod, sed quomodo