RIDGID Jointer restoration etc
-
Silly Car
- Posts: 1291
- Joined: Mon Mar 16, 2020 7:53 pm
- Has thanked: 316 times
- Been thanked: 1078 times
RIDGID Jointer restoration etc
As posted on the new tools thread, I bought myself a RIDGID Jointer via eBay locally from a chap who was moving house. He bought it new a few years ago while living in California and brought it it back with him. He said he spent 16 months living in the US and that was one year, three months and thirty days too long, I didn’t enquire as to his thoughts on US politics at this time.
The jointer is a 6” 1100w jointer which can be configured in 120/110V or 240/220V depending on supply, I have seen it running on 240V so I don’t think I need to poke around there. It has cask iron tables (roughly 4ft from end to end) and fence (45°-90°). The cutter block has 3 resharpenable / replaceable blades and apparently it is possible to retrofit a spiral cutting block with indexable TCT blades but that is very spendy for a machine that set me back £80.
Photos from eBay
As you can see, all of the machine finished cask iron is covered with surface rust which will need sorting. I’m also tempted to change the on/off switch for a no volt release (NVR) switch, add a soft start module and see if it is possible to duct the waste chute into an dust ex tractor.
The jointer is a 6” 1100w jointer which can be configured in 120/110V or 240/220V depending on supply, I have seen it running on 240V so I don’t think I need to poke around there. It has cask iron tables (roughly 4ft from end to end) and fence (45°-90°). The cutter block has 3 resharpenable / replaceable blades and apparently it is possible to retrofit a spiral cutting block with indexable TCT blades but that is very spendy for a machine that set me back £80.
Photos from eBay
As you can see, all of the machine finished cask iron is covered with surface rust which will need sorting. I’m also tempted to change the on/off switch for a no volt release (NVR) switch, add a soft start module and see if it is possible to duct the waste chute into an dust ex tractor.
-
Silly Car
- Posts: 1291
- Joined: Mon Mar 16, 2020 7:53 pm
- Has thanked: 316 times
- Been thanked: 1078 times
Re: RIDGID Jointer restoration etc
Stage One - leaning up the tables.
Yesterday, I took some 240grit dry ‘wet & dry’ paper on a block of timber to the whole table top which took are of the majority of the surface rust off without too much both and after brushing it down, it felt reasonably smooth to the touch. Once I’d finished tinkering for around 30 mins, I brushed everything clear before liberally coating the freshly sanded sections with WD40 and covered the jointer with a dust sheet.
I had 20 mins spare early so I took the same 240grit paper to the infeed table with a liberal application of more WD40 as a slip medium before wiping everything down with ethanol based hand sanitiser (liberated from the post Covid office supplies) before drying carefully and applying more WD40 to hopefully prevent any rust reappearing:
Very pleasing when compared to the simply sanded outfeed bed whose clean patch is from where the fence was positioned. Next job will be to repeat the same on the outfeed and fence before moving onto the cutter block.
Given the limited access to the block, it looks like I’ll have to remove, strip, sand, dress and reinstall that as it’ll be much easier to get a good finish on the rusty 1/3 which was exposed plus it’ll give me chance to full inspect the knives.
Yesterday, I took some 240grit dry ‘wet & dry’ paper on a block of timber to the whole table top which took are of the majority of the surface rust off without too much both and after brushing it down, it felt reasonably smooth to the touch. Once I’d finished tinkering for around 30 mins, I brushed everything clear before liberally coating the freshly sanded sections with WD40 and covered the jointer with a dust sheet.
I had 20 mins spare early so I took the same 240grit paper to the infeed table with a liberal application of more WD40 as a slip medium before wiping everything down with ethanol based hand sanitiser (liberated from the post Covid office supplies) before drying carefully and applying more WD40 to hopefully prevent any rust reappearing:
Very pleasing when compared to the simply sanded outfeed bed whose clean patch is from where the fence was positioned. Next job will be to repeat the same on the outfeed and fence before moving onto the cutter block.
Given the limited access to the block, it looks like I’ll have to remove, strip, sand, dress and reinstall that as it’ll be much easier to get a good finish on the rusty 1/3 which was exposed plus it’ll give me chance to full inspect the knives.
-
demographic
- Posts: 3715
- Joined: Mon Mar 16, 2020 9:30 pm
- Location: Less that 50 miles away from Moscow, but which one?
- Has thanked: 1059 times
- Been thanked: 1643 times
Re: RIDGID Jointer restoration etc
Although I've already described the gaping hole in my knowledge of fixed jointers/planers I do know you need a fairly serious extractor to cope with the pretty big shavings that come out of them.
Spiral head cuters help (with extraction, noise and chip size) but are expensive.
I'm not sure if cyclonic setups help, they may well.
I've got the bits for a cyclonic pre separator for my Festool CTM 26 extractor but I can't see that coping with its 27mm hose on a planer, its fine with a router, chopsaw, drilling concrete but struggles with a lecky handplaner so a 50mm hose (they do sell one) could make the difference.
Currently I don't really need one but I'm not running that kind of machinery.
Dunno about the best way to clean it up but Ive heard pastewax is good for keeping most of the rust off.
Spiral head cuters help (with extraction, noise and chip size) but are expensive.
I'm not sure if cyclonic setups help, they may well.
I've got the bits for a cyclonic pre separator for my Festool CTM 26 extractor but I can't see that coping with its 27mm hose on a planer, its fine with a router, chopsaw, drilling concrete but struggles with a lecky handplaner so a 50mm hose (they do sell one) could make the difference.
Currently I don't really need one but I'm not running that kind of machinery.
Dunno about the best way to clean it up but Ive heard pastewax is good for keeping most of the rust off.
-
Silly Car
- Posts: 1291
- Joined: Mon Mar 16, 2020 7:53 pm
- Has thanked: 316 times
- Been thanked: 1078 times
Re: RIDGID Jointer restoration etc
Spookily I have just set up a cyclone on top of a 25l paint can attached to 30l Titan wet & dry vac with power outlet via 38mm hoses for hand power tools to save on the number of paper bags I get through. I can throughly recommend the Cen Tec (CTS) dust hose adaptors as they allow seemless switching of the hose to the next tool etc.
Time will tell to see how much debris the cyclone bucket catches and how much ends up in the vacuum bag, I’ve not cut a huge amount today but it looks like it a good amount so far. I’m tempted to attach it to the Evolution table saw and mitre saw to see if it copes but I don’t think the power take off on the vac is rated high enough for their motors but I’m sure there is a solution out there
I think 4” hoses are considered the minimum for planer thicknessers / jointers etc so I may be sweeping up wood chippings for a while unless something comes up on eBay / FB marketplace which takes my fancy.
I’ve seen multiple YouTuber recommending paste wax, I’m sure I have some in the garage as I used it as a mold release when I made some fibreglass panels years ago.
Time will tell to see how much debris the cyclone bucket catches and how much ends up in the vacuum bag, I’ve not cut a huge amount today but it looks like it a good amount so far. I’m tempted to attach it to the Evolution table saw and mitre saw to see if it copes but I don’t think the power take off on the vac is rated high enough for their motors but I’m sure there is a solution out there
I think 4” hoses are considered the minimum for planer thicknessers / jointers etc so I may be sweeping up wood chippings for a while unless something comes up on eBay / FB marketplace which takes my fancy.
I’ve seen multiple YouTuber recommending paste wax, I’m sure I have some in the garage as I used it as a mold release when I made some fibreglass panels years ago.
- ZRX61
- Posts: 8984
- Joined: Tue Mar 17, 2020 4:05 pm
- Location: Solar Blight Valley
- Has thanked: 2271 times
- Been thanked: 2654 times
Re: RIDGID Jointer restoration etc
Yup, the old style car wax works. BoeShield T9 is also popular. BoeShield also make stuff specifically for blades/bits & another to remove rust from tools.Silly Car wrote: Sun Jan 26, 2025 5:22 pm I’ve seen multiple YouTuber recommending paste wax, I’m sure I have some in the garage as I used it as a mold release when I made some fibreglass panels years ago.


In other news, I was wiping down the table on a bandsaw one time with a red Scotchbrite pad & grabbed a tin of TapMagic cutting fluid thinking it would be oily enough to protect the bare metal. It wiped the rust right off the table.
Last edited by ZRX61 on Sun Jan 26, 2025 6:38 pm, edited 1 time in total.
- ZRX61
- Posts: 8984
- Joined: Tue Mar 17, 2020 4:05 pm
- Location: Solar Blight Valley
- Has thanked: 2271 times
- Been thanked: 2654 times
Re: RIDGID Jointer restoration etc
The day after I arrived in the US I was told "Don't judge California by LA & don't judge the US by California"Silly Car wrote: Sun Jan 26, 2025 4:09 pm He said he spent 16 months living in the US and that was one year, three months and thirty days too long, I didn’t enquire as to his thoughts on US politics at this time.
Re: RIDGID Jointer restoration etc
Once you've cleaned up the tables and checked them for true (ie when set to a feed depth of zero they make up a flat plane) It is pretty much a given that the knives will require a sharpen and reset, and that'll be a good time to clean the cutter block. I have a 12" wide machine and a 4" extractor copes well with removing chips, but plenty (read: loads) of dust escapes to atmosphere. It's messy and after a lifetime of woodwork and woodmachining my appetite for getting woodchips down my neck and airways lined with dust has pretty much been satisfied. Some dust, particularly teak / iroko / similar are very irritationg to nose / throat. A planer does come in extremely handy though. Quite noisy. It is pretty rare to use the full width of the knife but machining 12" boards produces a lot of chips and any collection system will need to cope with plenty of volume. Your machine is a chunk narrower than that but I think collector volume is what will clog your extraction rather than inlet diameter - depends of the speed the air flows down the extractor inlet pipe. Bends massively compromise efficiency. You can by 4" dust extractors for very little but they take up space and are horrid to work with/on, changing bags etc. Good luck.. To make best use you'll need a thicknesser also.
-
Silly Car
- Posts: 1291
- Joined: Mon Mar 16, 2020 7:53 pm
- Has thanked: 316 times
- Been thanked: 1078 times
Re: RIDGID Jointer restoration etc
A bit more progress on the tables and fence
Not surgically clean but now rust free and smooth to the touch. I couldn’t find the paste wax I thought I had so covered it all in WD40 and a dust cloth while I source / find some wax and read up on how to adjust the outfeed table which dips in the areas show by arrows below. I used a 4ft level and a sheet of paper (couldn’t find feeler gauges either
)
I’ve got the original English and Spanish manuals (sadly been stored in a damp shed) so I’ll refer to them before braving the cold to search for feeler gauges and wax, before seeing if I can tweak the outfeed table towards being co-planer with the infeed which is surprisingly flat and level.
You can just about see the rust on the cutter block which I’ll attend to once I’ve trued the outfeed table.
Not surgically clean but now rust free and smooth to the touch. I couldn’t find the paste wax I thought I had so covered it all in WD40 and a dust cloth while I source / find some wax and read up on how to adjust the outfeed table which dips in the areas show by arrows below. I used a 4ft level and a sheet of paper (couldn’t find feeler gauges either
I’ve got the original English and Spanish manuals (sadly been stored in a damp shed) so I’ll refer to them before braving the cold to search for feeler gauges and wax, before seeing if I can tweak the outfeed table towards being co-planer with the infeed which is surprisingly flat and level.
You can just about see the rust on the cutter block which I’ll attend to once I’ve trued the outfeed table.
-
demographic
- Posts: 3715
- Joined: Mon Mar 16, 2020 9:30 pm
- Location: Less that 50 miles away from Moscow, but which one?
- Has thanked: 1059 times
- Been thanked: 1643 times
Re: RIDGID Jointer restoration etc
A lot of workshops have those wave over metal detectors they check timber with before it goes over a planer cos you don't want an imbedded nail to knacker up freshly sorted cutters.
It's bad enough doing that with my 82mm wide lecky handplaner, let alone a workshop one.
Oh and see reclaimed timber? Its best to just see it from a distance and not fire it through a planer.
It's bad enough doing that with my 82mm wide lecky handplaner, let alone a workshop one.
Oh and see reclaimed timber? Its best to just see it from a distance and not fire it through a planer.
-
Silly Car
- Posts: 1291
- Joined: Mon Mar 16, 2020 7:53 pm
- Has thanked: 316 times
- Been thanked: 1078 times
Re: RIDGID Jointer restoration etc
Very little progress this week as I felt pretty rough over the weekend. Both tables and fence have been liberally coated with Briwax and buffed to a shine.
I’ve wound the outfeed table up and down a couple of times which appears to have solved the co-planer issue as I suspect the jointer has been picked up using the tables which as altered the seating in the dovetails, it needs a cranking handle / wheel with I think 1/4” square drive to make that task easier.
With both tables wound right down, there is plenty of room to access the cutter block without necessarily having to remove it, so I’m hoping the Jenolite Rust Remover gel I’ve bought will take care of that task on the block and knives so I can look at either sharpening the existing knives or replacing them for the princely sum of around £20 for a set of three.
I’ve wound the outfeed table up and down a couple of times which appears to have solved the co-planer issue as I suspect the jointer has been picked up using the tables which as altered the seating in the dovetails, it needs a cranking handle / wheel with I think 1/4” square drive to make that task easier.
With both tables wound right down, there is plenty of room to access the cutter block without necessarily having to remove it, so I’m hoping the Jenolite Rust Remover gel I’ve bought will take care of that task on the block and knives so I can look at either sharpening the existing knives or replacing them for the princely sum of around £20 for a set of three.
- ZRX61
- Posts: 8984
- Joined: Tue Mar 17, 2020 4:05 pm
- Location: Solar Blight Valley
- Has thanked: 2271 times
- Been thanked: 2654 times
Re: RIDGID Jointer restoration etc
I'd run a piece of pine through as is right now just to see what finish the knives leave.
-
Silly Car
- Posts: 1291
- Joined: Mon Mar 16, 2020 7:53 pm
- Has thanked: 316 times
- Been thanked: 1078 times
Re: RIDGID Jointer restoration etc
Just finished the rust removal from the cutter block, using Jenolite Rust Remover which has done a pretty good job, although I did go over the worst third with some wet & dry to speed up the process. I’m left with a cutter block like this:
Two of the knives polished up nicely, the third (worst) is still a bit scabby but I gently cleaned up the cutting edge with some 400 grit to clear the worst of the surface rust. All waxed and polished up.
-
Silly Car
- Posts: 1291
- Joined: Mon Mar 16, 2020 7:53 pm
- Has thanked: 316 times
- Been thanked: 1078 times
Re: RIDGID Jointer restoration etc
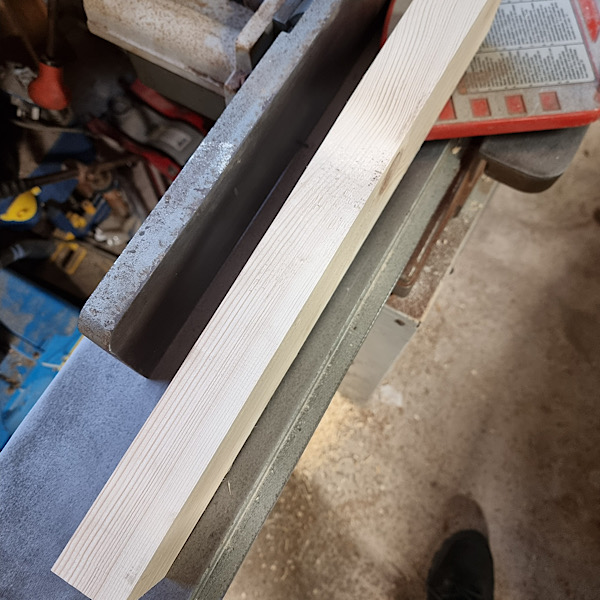
I took ZRX61’s advice after cleaning up the cutter block, wedges and blades and through a length of 4x2 CLS through it on face and edge.
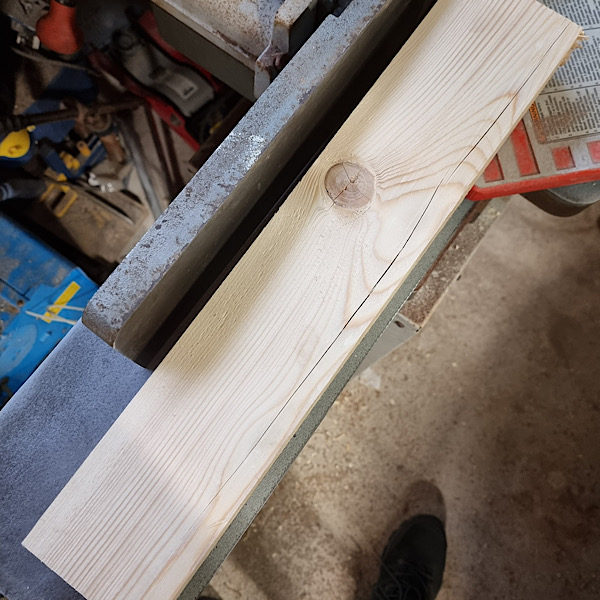
There is a fair amount of tear out from either the huge knot or from blunt / poorly set up knives. I did them using a piece of timber on the outfeed table setting the to just above flush with the surface (as per manual) but they made need fine tuning a touch. I set the fence to 90° to the tables, outfeed is now bang on co-planer to infeed and I ended up with:
Face
Edge
Resulting corner is exactly 90° as far as my engineer’s square, daylight and eyesight could tell me, with no rocking of the square anywhere along the length of the corner.
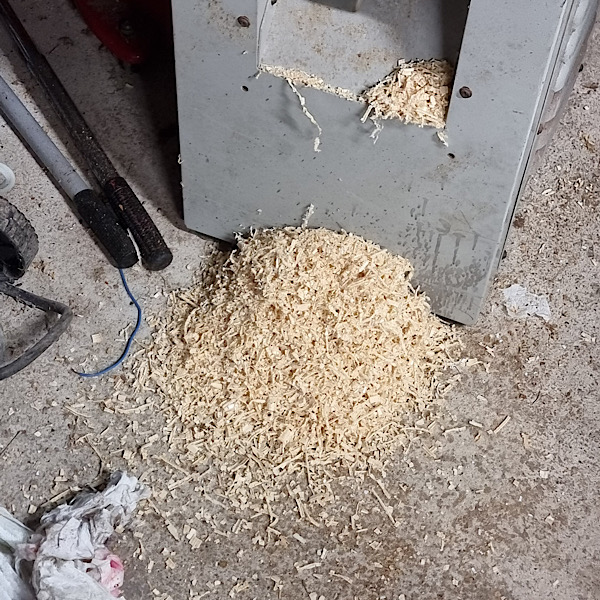
I also made the following:
Future jobs are to:
Add an NVR switch and soft start module
Make a trolley for it to easily move it around the garage without lifting by the tables.
Check and adjust blade alignment to ensure they are running true, if this doesn’t improve tear out, I’ll swap the blades out (I’ve now got two spare sets)
Make a sharpening jig to hold the blades at 38° to keen the edges sharpe using wet & dry and a suitably flat surface. This will be a longer term plan given the sets of blades I have

There is a fair amount of tear out from either the huge knot or from blunt / poorly set up knives. I did them using a piece of timber on the outfeed table setting the to just above flush with the surface (as per manual) but they made need fine tuning a touch. I set the fence to 90° to the tables, outfeed is now bang on co-planer to infeed and I ended up with:
Face
Edge
Resulting corner is exactly 90° as far as my engineer’s square, daylight and eyesight could tell me, with no rocking of the square anywhere along the length of the corner.
I also made the following:
Future jobs are to:
Add an NVR switch and soft start module
Make a trolley for it to easily move it around the garage without lifting by the tables.
Check and adjust blade alignment to ensure they are running true, if this doesn’t improve tear out, I’ll swap the blades out (I’ve now got two spare sets)
Make a sharpening jig to hold the blades at 38° to keen the edges sharpe using wet & dry and a suitably flat surface. This will be a longer term plan given the sets of blades I have