Yet another DIY q!!

General chat topics, anything and everything you want or need to discuss
Post Reply
User avatar
Noggin
Posts: 10081
Joined: Thu Mar 19, 2020 1:46 pm
Location: Ski Resort
Has thanked: 19486 times
Been thanked: 4942 times

Yet another DIY q!!

Post by Noggin »

Slightly random!!

I have a kitchen worktop that is hopefully going to be extended (swapping a fridge freezer for an under counter fridge :D ) so I need to check two things

- do I need something special/specific to join two pieces of work surface together?

- what can I use to 'cover' the cut edges? I have two cut edges that I'd like to cover!

Help!
Life is for living. Buy the shoes. Eat the cake. Ride the bikes. Just, ride the bikes!! :bblonde:
Phoenix
Posts: 257
Joined: Wed May 13, 2020 3:16 am
Has thanked: 81 times
Been thanked: 148 times

Re: Yet another DIY q!!

Post by Phoenix »

Noggin wrote: Thu Feb 25, 2021 12:19 pm Slightly random!! I have a kitchen worktop that is hopefully going to be extended (swapping a fridge freezer for an under counter fridge :D ) so I need to check two things:

- do I need something special/specific to join two pieces of work surface together?

- what can I use to 'cover' the cut edges? I have two cut edges that I'd like to cover!Help!
Depends if you want to hide how the two surfaces are joined. Just do a search for metal joining strips. Screw in from the bottom making sure the screws are not too long that they go through to the top. You could also use a piece of plywood or similar to hold them both together if fastened from below.

You can buy cover strips in all colours and materials. Plenty for sale on EBay.

Examples

https://www.ebay.co.uk/itm/313067284727 ... 3d0f7b0a53

https://www.diy.com/departments/kitchen ... 824275.cat

Good Luck

:P
Mussels
Posts: 5039
Joined: Mon Mar 16, 2020 9:02 pm
Has thanked: 781 times
Been thanked: 1068 times

Re: Yet another DIY q!!

Post by Mussels »

Joining strips are by far the easiest way, mitre joints aren't all that difficult but you need access to tools and space to use them. How picky are you about how it looks? If you are joining straight bits I'd just buy a new worktop the right length.
For exposed ends just buy end caps, remember to seal any cut edges with PVA or similar.
User avatar
DEADPOOL
Posts: 470
Joined: Mon Mar 16, 2020 11:13 pm
Has thanked: 63 times
Been thanked: 81 times

Re: Yet another DIY q!!

Post by DEADPOOL »

Much easier to buy a full size worktop and replace the existing half size one. Picture would help.
Jody
Posts: 2202
Joined: Fri Mar 20, 2020 11:49 am
Location: Biarritz in Summer, Cornwall In Autumn, Courchevel in Winter
Has thanked: 2317 times
Been thanked: 1821 times

Re: Yet another DIY q!!

Post by Jody »

How long does the finished worktop need to be?

I have a mate that works at a kitchen place and he regularly gets worktops FOC. You'll have to wait until next december for delivery (along with your conditioner and tea bags :lol: ) but if you let me know what you need I'll see what I can sort out before I leave the UK !
Silly Car
Posts: 1291
Joined: Mon Mar 16, 2020 7:53 pm
Has thanked: 316 times
Been thanked: 1078 times

Re: Yet another DIY q!!

Post by Silly Car »

While it possible to join two sections of worktop with minimal visible joint, you need some serious kit:
  • Something to cut them with - track saw, router and guide rail or template, table saw with cross cut sled - eg not a jigsaw ;)

    Something to cut slots for worktop clamps - router (either freehand or with a template

    Whilst not 100% necessary - something to help align the pieces - biscuit jointer, domino cutter, dowelling jig etc

    Glue and patience
Jointing strips will do the job, but they are imho designed to cover the gap rather than support the joint, so you’d need to glue and screw in a suitable support piece to keep the joint stable.

As has been said, an entire new piece of worktop might be your best bet.
User avatar
Noggin
Posts: 10081
Joined: Thu Mar 19, 2020 1:46 pm
Location: Ski Resort
Has thanked: 19486 times
Been thanked: 4942 times

Re: Yet another DIY q!!

Post by Noggin »

Phoenix wrote: Thu Feb 25, 2021 12:28 pm
Depends if you want to hide how the two surfaces are joined. Just do a search for metal joining strips. Screw in from the bottom making sure the screws are not too long that they go through to the top. You could also use a piece of plywood or similar to hold them both together if fastened from below.

You can buy cover strips in all colours and materials. Plenty for sale on EBay.

Examples

Good Luck

:P
Awesome - I'll have a look in the places in the valley first but might end up hitting ebay!!
Mussels wrote: Thu Feb 25, 2021 12:45 pm Joining strips are by far the easiest way, mitre joints aren't all that difficult but you need access to tools and space to use them. How picky are you about how it looks? If you are joining straight bits I'd just buy a new worktop the right length.
For exposed ends just buy end caps, remember to seal any cut edges with PVA or similar.
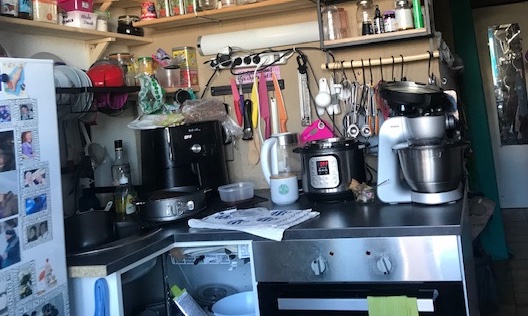
Really not picky at all - as you can see from the photos below!! LOL I managed to get a full length piece of work top (2.5m??) for about 15€ and it is a 'work in progress' to find out how to make the kitchen work best!!

DEADPOOL wrote: Thu Feb 25, 2021 1:00 pm Much easier to buy a full size worktop and replace the existing half size one. Picture would help.
Probably didn't write the first post well. A full size work top is wider than my apartment!! And the 'kitchen' is in a corner. So things need to be cut and joined whatever I do!! :D


Silly Car wrote: Thu Feb 25, 2021 2:16 pm While it possible to join two sections of worktop with minimal visible joint, you need some serious kit:
  • Something to cut them with - track saw, router and guide rail or template, table saw with cross cut sled - eg not a jigsaw ;)

    Something to cut slots for worktop clamps - router (either freehand or with a template

    Whilst not 100% necessary - something to help align the pieces - biscuit jointer, domino cutter, dowelling jig etc

    Glue and patience
Jointing strips will do the job, but they are imho designed to cover the gap rather than support the joint, so you’d need to glue and screw in a suitable support piece to keep the joint stable.

As has been said, an entire new piece of worktop might be your best bet.
LOL I'll have to check, but pretty sure it was originally cut with a jigsaw - just not by me!! LOL And if that's the way we do it this time, I won't be cutting it in a curve, that's for sure!! LOL

The whole apartment has been one 'on the cheap' and with favours as, once I'd bought it, I was physically able to do the things I'd planned!! So whilst this needs to be workable, it also isn't likely to be needed more than a couple of years! (Hopefully) I have a chippy friend who is willing to come out and swap holidays for spending the time here to redo the woodwork currently in place (partitions and kitchen!).

But, the end result this time does need to be useable.

The new end won't be home to anything heavy tho, but I'll have to find out how to support it!! :?


Really rubbish pictures!!

Right now I'm just going to use an offcut from the original work surface, so will need a join where the FridgeFreezer is at the moment. Plan is to put the acquired fridge there instead and get much more work surface and also be able to use the sink better!! :D It'll need a cover over the cut side (which will have to be curved to make sure I don't impale myself on it regularly!!) as well!

Image


This end will need a 'cover' as that has been open since it was originally cut/built
Image


Jody wrote: Thu Feb 25, 2021 1:52 pm How long does the finished worktop need to be?

I have a mate that works at a kitchen place and he regularly gets worktops FOC. You'll have to wait until next december for delivery (along with your conditioner and tea bags :lol: ) but if you let me know what you need I'll see what I can sort out before I leave the UK !
I might well take you up on a new piece - simply because the bit around the sink wasn't sealed well and so won't last very long as water goes into it (might also give me a chance to change the sink to a more user friendly version!! Cheap isn't always cheerful!!)

It will need two pretty short pieces - the hole for the sink impacts on them both!!

Life is for living. Buy the shoes. Eat the cake. Ride the bikes. Just, ride the bikes!! :bblonde:
User avatar
Noggin
Posts: 10081
Joined: Thu Mar 19, 2020 1:46 pm
Location: Ski Resort
Has thanked: 19486 times
Been thanked: 4942 times

Re: Yet another DIY q!!

Post by Noggin »

For a bit of scale, the are of the kitchen surfaces works out at just 149x149 cm - tichy!! :D
Life is for living. Buy the shoes. Eat the cake. Ride the bikes. Just, ride the bikes!! :bblonde:
Mussels
Posts: 5039
Joined: Mon Mar 16, 2020 9:02 pm
Has thanked: 781 times
Been thanked: 1068 times

Re: Yet another DIY q!!

Post by Mussels »

Silly Car wrote: Thu Feb 25, 2021 2:16 pm While it possible to join two sections of worktop with minimal visible joint, you need some serious kit:
  • Something to cut them with - track saw, router and guide rail or template, table saw with cross cut sled - eg not a jigsaw ;)

    Something to cut slots for worktop clamps - router (either freehand or with a template

    Whilst not 100% necessary - something to help align the pieces - biscuit jointer, domino cutter, dowelling jig etc

    Glue and patience
Jointing strips will do the job, but they are imho designed to cover the gap rather than support the joint, so you’d need to glue and screw in a suitable support piece to keep the joint stable.

As has been said, an entire new piece of worktop might be your best bet.
You forgot handsaw option, they are pretty easy to cut. ;)
Silly Car
Posts: 1291
Joined: Mon Mar 16, 2020 7:53 pm
Has thanked: 316 times
Been thanked: 1078 times

Re: Yet another DIY q!!

Post by Silly Car »

Mussels wrote: Thu Feb 25, 2021 3:47 pm
Silly Car wrote: Thu Feb 25, 2021 2:16 pm While it possible to join two sections of worktop with minimal visible joint, you need some serious kit:
  • Something to cut them with - track saw, router and guide rail or template, table saw with cross cut sled - eg not a jigsaw ;)

    Something to cut slots for worktop clamps - router (either freehand or with a template

    Whilst not 100% necessary - something to help align the pieces - biscuit jointer, domino cutter, dowelling jig etc

    Glue and patience
Jointing strips will do the job, but they are imho designed to cover the gap rather than support the joint, so you’d need to glue and screw in a suitable support piece to keep the joint stable.

As has been said, an entire new piece of worktop might be your best bet.
You forgot handsaw option, they are pretty easy to cut. ;)
I did but then again I thought we were talking about extending a straight section rather than replacing a section with a longer bit which is what I’d do in this scenario having seen the picture, just get rid of the stubby bit, add a panel the other side of the new fridge and whack in a section of worktop with a jointing strip and a couple of connector blocks either end.
User avatar
Noggin
Posts: 10081
Joined: Thu Mar 19, 2020 1:46 pm
Location: Ski Resort
Has thanked: 19486 times
Been thanked: 4942 times

Re: Yet another DIY q!!

Post by Noggin »

Silly Car wrote: Thu Feb 25, 2021 3:57 pm
Mussels wrote: Thu Feb 25, 2021 3:47 pm
Silly Car wrote: Thu Feb 25, 2021 2:16 pm While it possible to join two sections of worktop with minimal visible joint, you need some serious kit:
  • Something to cut them with - track saw, router and guide rail or template, table saw with cross cut sled - eg not a jigsaw ;)

    Something to cut slots for worktop clamps - router (either freehand or with a template

    Whilst not 100% necessary - something to help align the pieces - biscuit jointer, domino cutter, dowelling jig etc

    Glue and patience
Jointing strips will do the job, but they are imho designed to cover the gap rather than support the joint, so you’d need to glue and screw in a suitable support piece to keep the joint stable.

As has been said, an entire new piece of worktop might be your best bet.
You forgot handsaw option, they are pretty easy to cut. ;)
I did but then again I thought we were talking about extending a straight section rather than replacing a section with a longer bit which is what I’d do in this scenario having seen the picture, just get rid of the stubby bit, add a panel the other side of the new fridge and whack in a section of worktop with a jointing strip and a couple of connector blocks either end.
Sorry, didn't give proper info to start with!!


I don't think the left over piece of worktop is big enough to use instead of the stubby bit, but I'll dig it out soon and see!! Might have to be a 'stubby' bit and an extra bit for now :(
Life is for living. Buy the shoes. Eat the cake. Ride the bikes. Just, ride the bikes!! :bblonde:
User avatar
Cousin Jack
Posts: 6039
Joined: Mon Mar 16, 2020 4:36 pm
Location: Down in the Duchy
Has thanked: 2982 times
Been thanked: 2514 times

Re: Yet another DIY q!!

Post by Cousin Jack »

Being picky, that sink is going to be a problem. Unless I am mistaken the 'join' in the worktop runs through the sink, and unless your washing up is a lot more careful than mine the water WILL get into the join and in time that will cause problems.
Cornish Tart #1

Remember An Gof!
User avatar
Noggin
Posts: 10081
Joined: Thu Mar 19, 2020 1:46 pm
Location: Ski Resort
Has thanked: 19486 times
Been thanked: 4942 times

Re: Yet another DIY q!!

Post by Noggin »

Cousin Jack wrote: Thu Feb 25, 2021 8:13 pm Being picky, that sink is going to be a problem. Unless I am mistaken the 'join' in the worktop runs through the sink, and unless your washing up is a lot more careful than mine the water WILL get into the join and in time that will cause problems.
That's one of the reasons I'm treating this worktop as sort of temporary!! It wasn't sealed properly and whilst I've tried to make it ok, I'm not convinced and the damage would have been done anyway!!

But, given the space (and that I can now use things better so can deal with a low fridge and different shelves etc) a lot of what I've done has had to be trial and error! (A lot of error sadly!)

:)
Life is for living. Buy the shoes. Eat the cake. Ride the bikes. Just, ride the bikes!! :bblonde:
User avatar
Cousin Jack
Posts: 6039
Joined: Mon Mar 16, 2020 4:36 pm
Location: Down in the Duchy
Has thanked: 2982 times
Been thanked: 2514 times

Re: Yet another DIY q!!

Post by Cousin Jack »

Noggin wrote: Thu Feb 25, 2021 8:20 pm ......................... a lot of what I've done has had to be trial and error! (A lot of error sadly!)
We have all been there. Some of us are so old that we have forgotten our mistakes. :D
Cornish Tart #1

Remember An Gof!
User avatar
Noggin
Posts: 10081
Joined: Thu Mar 19, 2020 1:46 pm
Location: Ski Resort
Has thanked: 19486 times
Been thanked: 4942 times

Re: Yet another DIY q!!

Post by Noggin »

Cousin Jack wrote: Thu Feb 25, 2021 8:27 pm
Noggin wrote: Thu Feb 25, 2021 8:20 pm ......................... a lot of what I've done has had to be trial and error! (A lot of error sadly!)
We have all been there. Some of us are so old that we have forgotten our mistakes. :D
It's the downside of trying to change a tiny studio apartment into a tiny apartment with an actual bed!! LOL To find the best use of space, whatever changes are made, they have to be 'lived with' for a bit to make sure they work!!

Hence changing the fridge freezer to a fridge - it'll open up the kitchen/sitting bit more! Hopefully!!
Life is for living. Buy the shoes. Eat the cake. Ride the bikes. Just, ride the bikes!! :bblonde:
User avatar
DefTrap
Posts: 4740
Joined: Tue Apr 14, 2020 8:23 am
Has thanked: 1838 times
Been thanked: 1468 times

Re: Yet another DIY q!!

Post by DefTrap »

Noggin wrote: Fri Feb 26, 2021 8:37 am
It's the downside of trying to change a tiny studio apartment into a tiny apartment with an actual bed!! LOL To find the best use of space, whatever changes are made, they have to be 'lived with' for a bit to make sure they work!!

Hence changing the fridge freezer to a fridge - it'll open up the kitchen/sitting bit more! Hopefully!!
A mate of mine is a singleton living in a small house. His fridge broke and he didn't replace it for 10 years, figuring that he generally are what he shopped the same day, and for at least half the year you can keep things cold enough outside on the windowsill or in the shade ...
User avatar
Noggin
Posts: 10081
Joined: Thu Mar 19, 2020 1:46 pm
Location: Ski Resort
Has thanked: 19486 times
Been thanked: 4942 times

Re: Yet another DIY q!!

Post by Noggin »

DefTrap wrote: Fri Feb 26, 2021 11:27 am
Noggin wrote: Fri Feb 26, 2021 8:37 am
It's the downside of trying to change a tiny studio apartment into a tiny apartment with an actual bed!! LOL To find the best use of space, whatever changes are made, they have to be 'lived with' for a bit to make sure they work!!

Hence changing the fridge freezer to a fridge - it'll open up the kitchen/sitting bit more! Hopefully!!
A mate of mine is a singleton living in a small house. His fridge broke and he didn't replace it for 10 years, figuring that he generally are what he shopped the same day, and for at least half the year you can keep things cold enough outside on the windowsill or in the shade ...
Oh yes! In theory I could do that here a bit - but I don't have a windowsill :( :( And being up here I tend to bulk buy when I get to go to the valley!! LOL

But people with windowsills or balconies here do tend to keep a lot outside - until it gets too cold! :lol: Seen a few 'popped' beer bottles on balconies over the years! :lol: :lol:
Life is for living. Buy the shoes. Eat the cake. Ride the bikes. Just, ride the bikes!! :bblonde:
Post Reply